Earlier this summer, my family celebrated the first of my children to graduate high school. Her graduation party was filled with shareable moments safely enabled by guest Wi-Fi — a separate network specifically designed for visitors — on my Tipmont-provided Wi-Fi router.
From end-of-summer shindigs to fantasy football drafts, it’s a great way to grant internet access to guests without worrying about security.

What is guest wi-fi?
Guest Wi-Fi, also known as a guest network, is a separate wireless network that runs alongside your primary home Wi-Fi network. It allows visitors to use your internet connection apart from your main network where your personal devices, shared files and sensitive information reside. Think of it like an apartment on your property: Guests can come and go (guest Wi-Fi) but can’t wander into your main house (your primary Wi-Fi).
Risks and best practices
Who should enable Guest Wi-Fi?
- Households with regular visitors
Simplify access for visiting friends, family or babysitters while maintaining your privacy. - Home offices
If you work at home, keep your data and devices separated as clients or colleagues visit. - Homes with many devices
It’s great for smart bulbs, thermostats or appliances, which often have weaker security protocols. - Airbnb or rental property owners
If you rent your space, guest Wi-Fi is essential to provide access without compromising security.
Guest Wi-Fi Risks
- Guest behavior: Misuse/illegal activities could create legal implications for you. Know who you give access to and remind them to browse safely, avoid suspicious websites and never download files from untrusted sources.
- Network congestion: Although separated, too many users or bandwidth-heavy activities (e.g., streaming) might affect your overall network performance.
- Correct configuration: You can enable guest Wi-Fi yourself (see instructions below). But if you need a little extra help, feel free to call our support team at 800-726-3953, extension 4.
Guest Wi-Fi best practices
- Use a strong, unique password that is not the same as for your main network.
- Disable the guest network when it’s not in use.
- If you keep the guest network enabled, periodically change the password.
How to enable Guest Wi-Fi
Enabling guest Wi-Fi on your Tipmont-provided router is a straightforward process. You can also call our internet support team at 800-726-3953, extension 4, if you prefer to have one of our experts remotely assist you.
Instructions
- Open the Command IQ app (available from Apple’s App Store and Android’s Google Play)
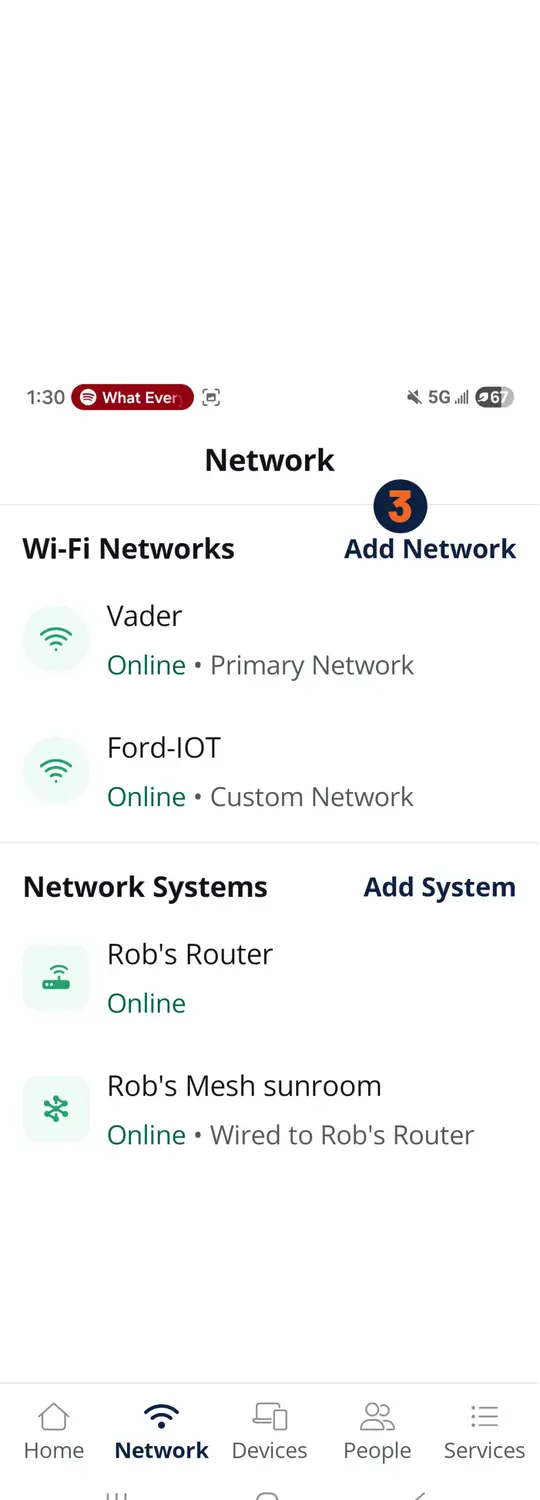
- From the main navigation at the bottom, tap “Network”
- On the Network screen, tap Add Network.
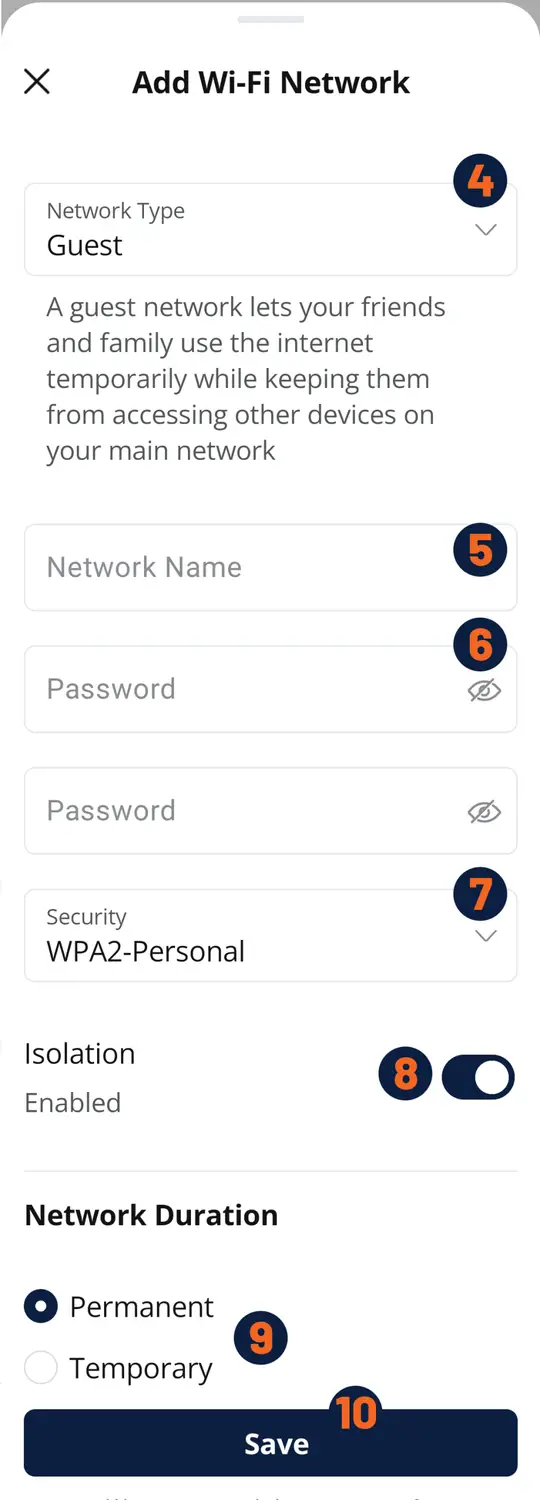
- Tap the Network Type drop down and choose “Guest”
- Under Network Name (SSID), type the name you want your guests to see when they connect to your guest network.
- Under Password, enter the password you want guests to use when connecting. If you choose None under Security Type, there password field will disappear.
- Under Security Type, there are five options. We recommend WPA2-WPA3-Personal, which lets older devices connect while giving newer devices the best security. Learn More »
- Under Isolation, choose Enabled or Disabled. We recommend choosing Enabled to isolate the network from your primary home networks.
- Under Duration, choose Permanent or Temporary. Permanent will retain the Guest Wi-Fi until you disable it. Temporary allows you to set a start date/time and end date/time.
- Click Save at the upper right to create the Guest Wi-Fi network. Your devices may temporarily disconnect as the new network is added to your router. This will only take a few minutes, and your devices will automatically reconnect.